

The Te Pōrere Redoubts are one of New Zealand's most nationally significant places. The Redoubts reflect the final phase of the New Zealand Wars and are closely associated with Te Kooti who emerged as one of the leading figures of this period, and was the founder of the Ringatu faith. The Te Porere Redoubts are of cultural, spiritual and social importance to the people of Tuwharetoa, Ringatū Church and community respectively, and they have commemorative value as a monument to the New Zealand Wars. The Redoubts also possess technological value as an example of the Māori adaptation of classic British military construction techniques, and form part of a wider cultural and historical landscape that is associated with Lieutenant McDonnell's campaign against Te Kooti and his supporters in September-October 1869.

List Entry Information
Status
Listed
List Entry Status
Historic Place Category 1
Access
Able to Visit
List Number
7652
Date Entered
24th March 2006
Date of Effect
24th March 2006
City/District Council
Ruapehu District
Region
Horizons (Manawatū-Whanganui) Region
Extent of List Entry
The Registration includes the upper redoubt (T19/55), lower redoubt (T19/56) and rifle pit (T19/57), which are located respectively on Pt Okahukura 6A2 (Maori Reserve 0.4046 ha), Pt Okahukura 8M2C1 (Historic Reserve 46.5388 ha) and Pt Papakai No 1 (Maori Reserve 8.5237 ha), in the Te Porere Reserve. Registration is also to include Section 1 Blk VIII, Tongariro Survey District (Historic Reserve 3.1056 ha), as Te Kooti and his supporters escaped from the upper redoubt through the bush that is now contained within this land parcel. The total extent of registration is 58.5727 hectares.
Legal description
Pt Okahukura 6A2, Blk VIII, Tongariro SD: Land set aside as Maori Reserve NZ Gazette, 1959, p.519. Pt Okahukura 6B and Pt Okahukura 8M2C1, Blk VIII, Tongariro SD: Land set aside as Historic Reserve NZ Gazette, 1966, p.1581. Pt Papakai No 1, Blks IV and VIII, Tongariro SD: Land set aside as Maori Reserve NZ Gazette, 1963, p.1561; NZ Gazette, 1964, p.1763. Sec 1 Blk VIII, Tongariro SD: Land set aside as Historic Reserve NZ Gazette, 1977, p.2700.
Location Description
26km southwest of Tūrangi
Why is this place significant?
Cultural Significance
The upper and lower redoubts are both located on Māori reserves and are deeply significant to the people of Tūwharetoa whose ancestors fought in the battle alongside Te Kooti. Te Pōrere Redoubts are also of cultural importance to the descendants of the Māori soldiers who fought for the government and were injured, killed or taken prisoner. Te Pōrere Redoubts have spiritual importance through their association with Te Kooti and the Ringatū faith, and are symbols of Te Kooti's resistance against oppression from government forces. As parekura (battle sites) and urupā, the redoubts also possess important wāhi tapu values.
Historic Significance
Historical Significance or Value Whilst the Te Pōrere Redoubts are significant on a number of levels, it is undoubtedly their historical importance that makes them deserving of registration as a Category I Historic Place. The redoubts are of national historical significance as the battle of Te Pōrere was to be the final staged engagement of the New Zealand Wars.
Physical Significance
Archaeological: Te Pōrere Redoubts possess several key characteristics that make them one of the most significant archaeological sites in New Zealand. They are an excellent representative example of a New Zealand Wars site and have considerable informational potential. The two redoubts are still clearly visible within the landscape and their condition and setting has been described as "the least modified of any of the New Zealand War sites". Together, the two redoubts and rifle pit have group value as an entire defensive complex. Technological: Whilst the technical accomplishment of the Te Pōrere redoubts has been criticised, they are still significant as representative examples of the adoption of British military design by Māori forces during the New Zealand Wars.
Why is this place Category 1 / Category 2?
Detail Of Assessed Criteria
(a) The extent to which the place reflects important or representative aspects of New Zealand history Te Pōrere Redoubts reflect an important period in New Zealand's colonial history as the battle of Te Pōrere is viewed as the climax to the government's campaigns against Te Kooti during the final phase of the New Zealand Wars. (b)The association of the place with events, persons, or ideas of importance in New Zealand history Te Pōrere Redoubts are strongly associated with Te Kooti who emerged as one of the leading figures of the New Zealand Wars. Te Kooti became an influential leader during the latter years of the wars after experiencing a spiritual revelation during his time as a prisoner on the Chatham Islands. It was on the Chatham Islands that Te Kooti founded the Ringatū faith, which has been described as "the oldest of the surviving, indigenous, scripturally based religions in Aotearoa". (c) The potential of the place to provide knowledge of New Zealand history A great deal of knowledge has been already been gathered about the Te Pōrere Redoubts through a combination of detailed historical research and archaeological survey. Whilst there is potential for further knowledge to be obtained through archaeological excavation, this is not recommended as a future course of action for such a nationally significant site. (d) The importance of the place to tangata whenua Te Pōrere Redoubts are of cultural and spiritual importance to the people of Tūwharetoa, and to followers of the Ringatū faith. It is important to note that the Te Pōrere redoubts are also of cultural importance to the descendants of the Māori troops from Whanganui, Inland Pātea and the Hawke's Bay who fought for the government during the battle. (e) The community association with, or public esteem for, the place The community association with the Te Pōrere Redoubts is clearly evident from the correspondence and clippings in the NZHPT files. Local volunteer groups such as the Whanganui Tramping Club were instrumental in the early development of the site, providing volunteer labour for tasks such as vegetation clearance. Public esteem for the Te Pōrere Redoubts is reflected by the large crowds and widespread media attention that both the official opening (1961) and centenary celebration (1969) attracted, and by their continual popularity as a visitor attraction. There are no available statistics on visitor numbers, but estimates suggest 5000 people per year. (f) The potential of the place for public education Te Pōrere Redoubts have tremendous public education potential. As Ritchie and Barr (1994: 11) state, Te Pōrere "affords a unique opportunity to interpret the events they reflect where they took place for the enlightenment and understanding of present and future generations". The existing signage provides a summary of the key historical details, but there is considerable potential to expand public education opportunities through more detailed interpretation panels, as currently being developed for Ōtātara Pā in Napier. (g) The technical accomplishment or value, or design of the place Whilst the technical accomplishment of the Te Pōrere Redoubts has been criticised by historians, they are still an excellent, well-preserved example of the use of British military construction techniques by Māori forces during the campaigns of the New Zealand Wars. The maze-like design of the lower redoubt (also referred to as "the trenches") is of particular interest as Wilson (1961: 67) notes that the usual design of trenches "was linear, at right angles to the anticipated line of attack, with supplementary, smaller trenches running off". (h) The symbolic or commemorative value of the place Te Pōrere redoubts commemorate the last major engagement of the New Zealand Wars and have symbolic value through their connection with Te Kooti and the Ringatū faith. (k) The extent to which the place forms part of a wider historical and cultural complex or historical and cultural landscape Te Pōrere Redoubts and rifle pit form part of a much wider historical and cultural landscape that is associated with McDonnell's pursuit of Te Kooti and his supporters during September and October 1869 Other components of this landscape include the site of Lieutenant Colonel McDonnell's camp at Poutu, and the battle site of Te Pononga.
Construction Details
Start Year
1869
Finish Year
1869
Type
Original Construction
Construction Materials
Archaeological site - ditch and bank defences, rifle pit
Notable Features
two redoubts, rifle pit
Construction Details
Start Year
1869
Finish Year
1869
Type
Original Construction
Construction Materials
Archaeological site - ditch and bank defences, rifle pit
Notable Features
two redoubts, rifle pit
There are several historical accounts of the battle at Te Pōrere and it is clear that there multiple and often conflicting stories. As Wilson (1961: 49) attests, "the story of the battle became embroiled with myth and fiction" with the passage of time. During the period 2 - 4 October 1869, Lieutenant Colonel Thomas McDonnell and his government forces marched to the Māori settlement of Papakai where a sighting of Te Kooti had been reported. They found the settlement deserted but trained militia scouts soon discovered that Te Kooti had established himself at a redoubt called Te Pōrere (the upper redoubt) on a hill to the east. They also learned that some of Te Kooti's supporters were based at a smaller outpost closer to the Whanganui River, whilst others were positioned in the bush directly west of the upper redoubt. It is estimated that Te Kooti's supporters numbered between 300 and 400, and that approximately one third were women. Major Kemp (Keepa Te Rangihiwinui) and his men soon joined McDonnell at Papakai, and it is estimated that their combined forces numbered over 500. On the basis of figures provided by Major Kemp and the writings of McDonnell, it has been determined that the gathered troops consisted of approximately 100 Europeans from the No. 2 Division of the Armed Constabulary; 112 Whanganui Maori led by Major Kemp; 100 members of Te Arawa led by Captain St. George and Lieutenant Preece; 130 members of Ngāti Kahungunu led by Hēnare Tomoana and Renata Kawepo, and 100 members of Ngāti Upokoiri who met up with Renata Kawepo as he passed through inland Patea. McDonnell issued an order to storm the Te Pōrere redoubts at first light on 4 October 1869, and historical accounts of the battle indicate that a three-pronged attack was devised, with Major Kemp and his Whanganui forces advancing from the left, Ngāti Kahungunu from the right and McDonnell and the Armed Constabulary from the centre. Wilson's (1961: 44-46) summary of the ensuing battle is based upon the accounts of Major Kemp and McDonnell, and indicates that the Whanganui forces were the first to reach Te Kooti's supporters at the lower redoubt. The Te Arawa and Ngaāti Kahungunu contingents had meanwhile encountered some of Te Kooti's supporters on the banks of the Whanganui River and forced them to retreat to their outposts. The combined government forces then approached the upper redoubt, with Ngāti Kahungunu in front, Te Arawa to the right and the Whanganui contingent and Armed Constabulary to the left. As they approached, Te Kooti hoisted two white flags emblazoned with a half moon, a cross and the letters 'W.J.' in red. As the government forces moved in on the upper redoubt, a bullet to the head killed Captain St. George. Captain St. George was the only European casualty of the entire battle and is believed to have been killed by Peita Kōtuku who later claimed "It was I who shot a pakeha officer as he was leading his men in a charge up to the front of the pa". The upper redoubt could not be fully surrounded as some of Te Kooti's forces maintained a heavy fire from higher ground to the west and from the bush to the north, but the invading forces did manage to reach the trenches on three sides, and tried to undermine the parapets. The redoubt was stormed shortly after, but Te Kooti had already escaped into nearby bush. There were three further casualties from the government forces, and three men were also injured. The deceased were: Komene (Te Arawa), Pape (Whanganui) and Winiata (Whanganui), who is said to have died whilst standing on top of the wall of the redoubt, shooting down upon Te Kooti's supporters inside. A total of thirty-seven of Te Kooti's supporters were killed during the battle of Te Porere, and seventy were injured. McDonnell official dispatch reported that twenty-seven bodies were found inside the redoubt, and another ten were discovered on the battlefield. McDonnell later wrote, "We buried their dead by throwing down the sides of the angle on them", and as previously noted, human remains were later discovered in the north-western flanking angle, which is now marked with a memorial stone. A number of Te Kooti's supporters were also taken prisoner, but the exact figure is unknown. The reported total varies from twenty to seventy. Historical accounts indicate that the battle of Te Pōrere was brief, and after the defeat, the government forces returned to their camp with the prisoners. Te Porere subsequently became known as the site of Te Kooti's "last stand", and lay relatively untouched until the 1950s.
There are several historical accounts of the battle at Te Pōrere and it is clear that there multiple and often conflicting stories. As Wilson (1961: 49) attests, "the story of the battle became embroiled with myth and fiction" with the passage of time. During the period 2 - 4 October 1869, Lieutenant Colonel Thomas McDonnell and his government forces marched to the Māori settlement of Papakai where a sighting of Te Kooti had been reported. They found the settlement deserted but trained militia scouts soon discovered that Te Kooti had established himself at a redoubt called Te Pōrere (the upper redoubt) on a hill to the east. They also learned that some of Te Kooti's supporters were based at a smaller outpost closer to the Whanganui River, whilst others were positioned in the bush directly west of the upper redoubt. It is estimated that Te Kooti's supporters numbered between 300 and 400, and that approximately one third were women. Major Kemp (Keepa Te Rangihiwinui) and his men soon joined McDonnell at Papakai, and it is estimated that their combined forces numbered over 500. On the basis of figures provided by Major Kemp and the writings of McDonnell, it has been determined that the gathered troops consisted of approximately 100 Europeans from the No. 2 Division of the Armed Constabulary; 112 Whanganui Maori led by Major Kemp; 100 members of Te Arawa led by Captain St. George and Lieutenant Preece; 130 members of Ngāti Kahungunu led by Hēnare Tomoana and Renata Kawepo, and 100 members of Ngāti Upokoiri who met up with Renata Kawepo as he passed through inland Patea. McDonnell issued an order to storm the Te Pōrere redoubts at first light on 4 October 1869, and historical accounts of the battle indicate that a three-pronged attack was devised, with Major Kemp and his Whanganui forces advancing from the left, Ngāti Kahungunu from the right and McDonnell and the Armed Constabulary from the centre. Wilson's (1961: 44-46) summary of the ensuing battle is based upon the accounts of Major Kemp and McDonnell, and indicates that the Whanganui forces were the first to reach Te Kooti's supporters at the lower redoubt. The Te Arawa and Ngaāti Kahungunu contingents had meanwhile encountered some of Te Kooti's supporters on the banks of the Whanganui River and forced them to retreat to their outposts. The combined government forces then approached the upper redoubt, with Ngāti Kahungunu in front, Te Arawa to the right and the Whanganui contingent and Armed Constabulary to the left. As they approached, Te Kooti hoisted two white flags emblazoned with a half moon, a cross and the letters 'W.J.' in red. As the government forces moved in on the upper redoubt, a bullet to the head killed Captain St. George. Captain St. George was the only European casualty of the entire battle and is believed to have been killed by Peita Kōtuku who later claimed "It was I who shot a pakeha officer as he was leading his men in a charge up to the front of the pa". The upper redoubt could not be fully surrounded as some of Te Kooti's forces maintained a heavy fire from higher ground to the west and from the bush to the north, but the invading forces did manage to reach the trenches on three sides, and tried to undermine the parapets. The redoubt was stormed shortly after, but Te Kooti had already escaped into nearby bush. There were three further casualties from the government forces, and three men were also injured. The deceased were: Komene (Te Arawa), Pape (Whanganui) and Winiata (Whanganui), who is said to have died whilst standing on top of the wall of the redoubt, shooting down upon Te Kooti's supporters inside. A total of thirty-seven of Te Kooti's supporters were killed during the battle of Te Porere, and seventy were injured. McDonnell official dispatch reported that twenty-seven bodies were found inside the redoubt, and another ten were discovered on the battlefield. McDonnell later wrote, "We buried their dead by throwing down the sides of the angle on them", and as previously noted, human remains were later discovered in the north-western flanking angle, which is now marked with a memorial stone. A number of Te Kooti's supporters were also taken prisoner, but the exact figure is unknown. The reported total varies from twenty to seventy. Historical accounts indicate that the battle of Te Pōrere was brief, and after the defeat, the government forces returned to their camp with the prisoners. Te Porere subsequently became known as the site of Te Kooti's "last stand", and lay relatively untouched until the 1950s.
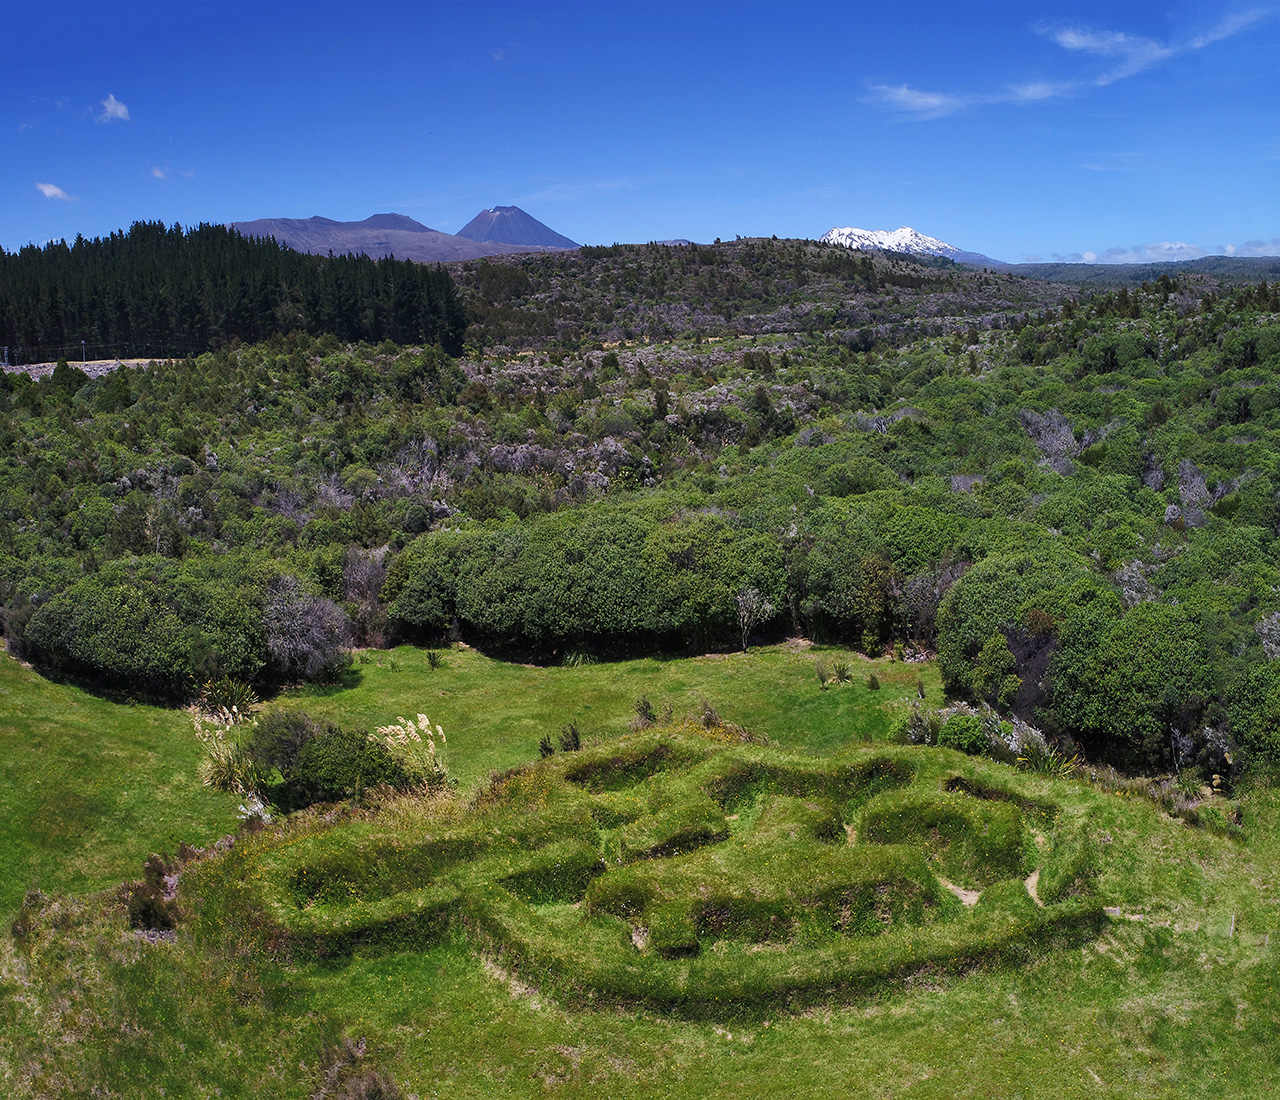
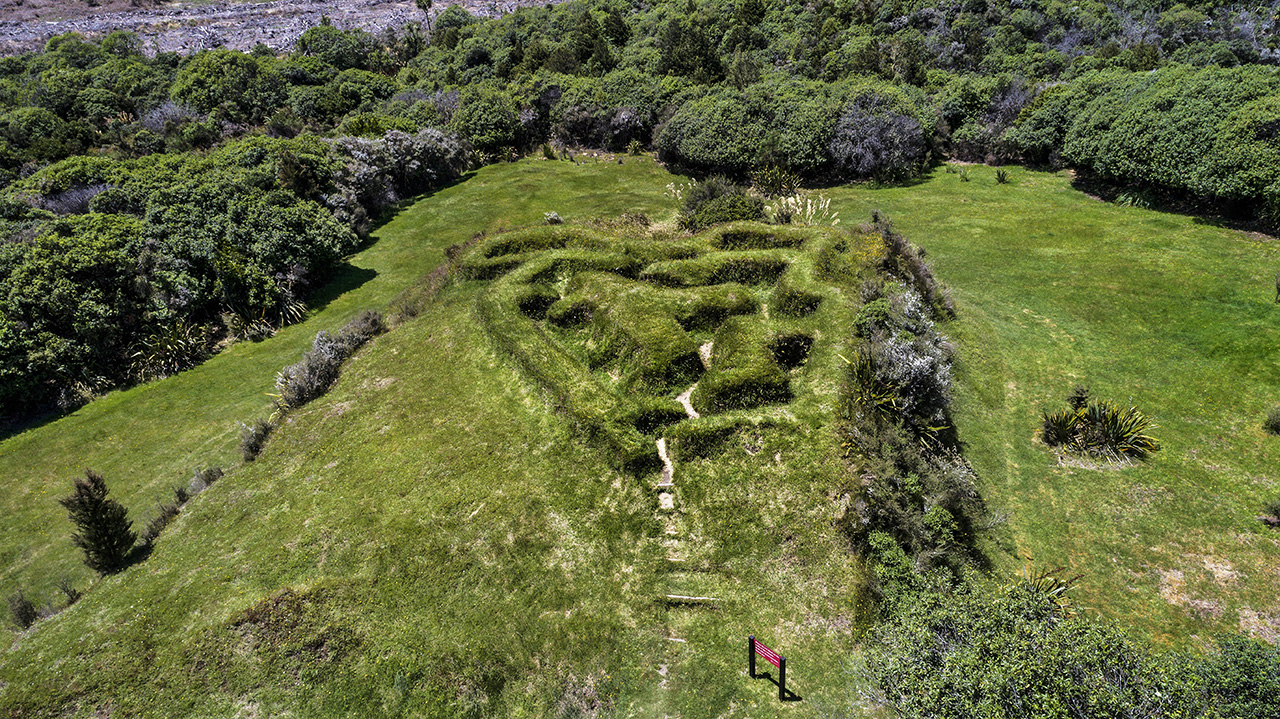
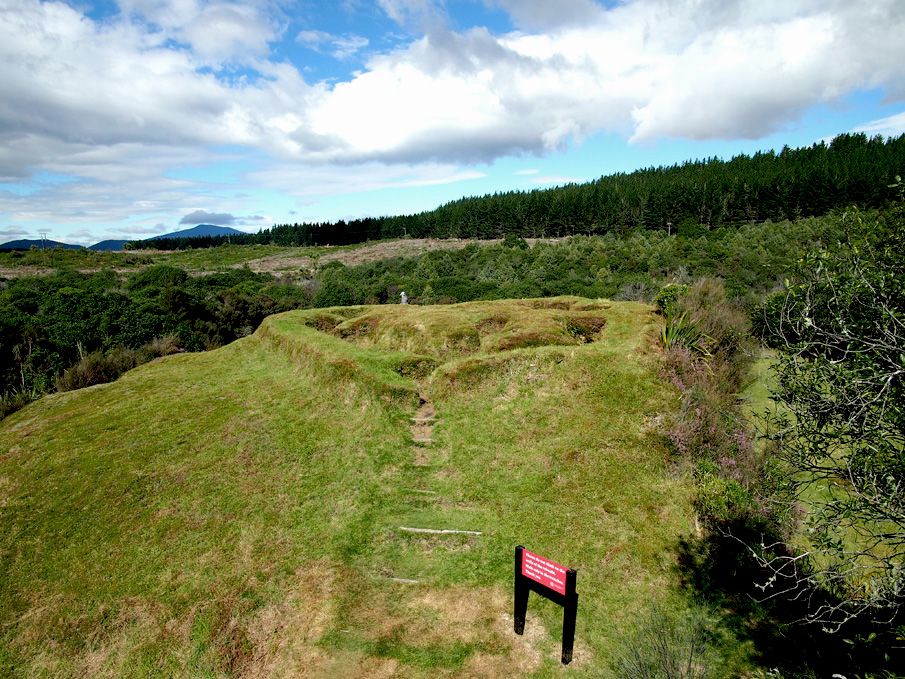
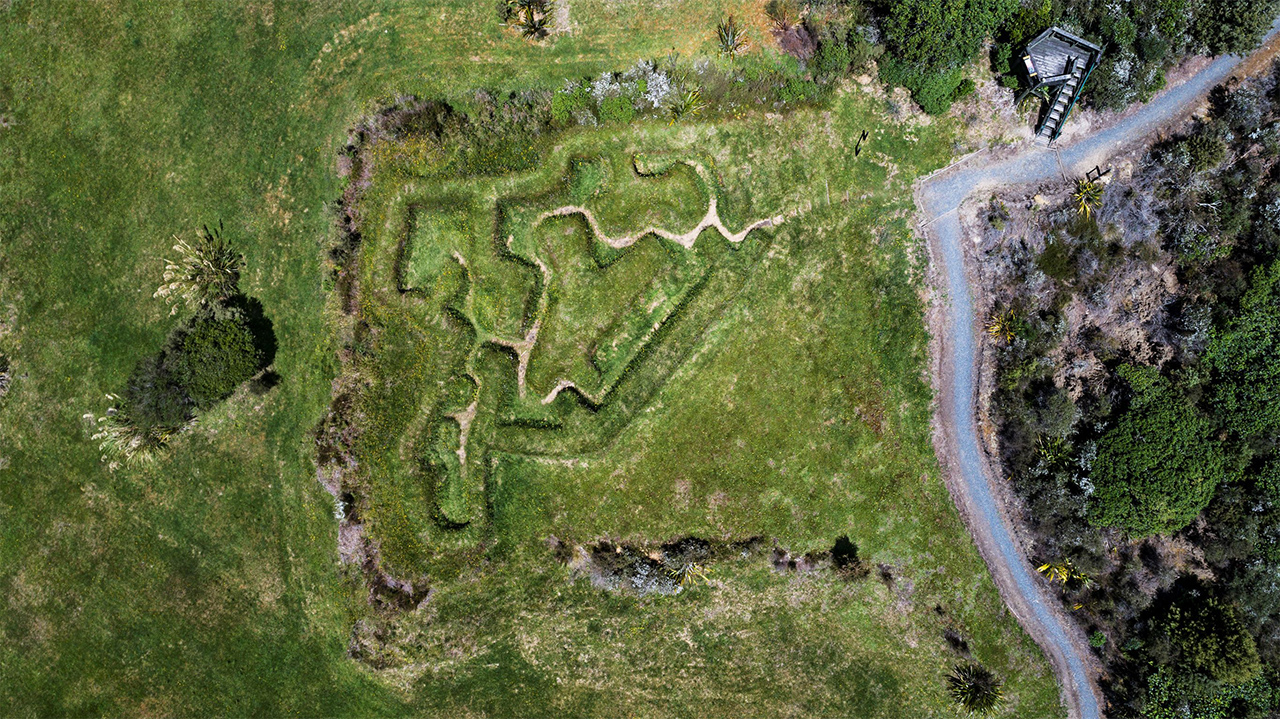
The three integral features of the Te Pōrere battle-site are the upper redoubt (T19/55), lower redoubt (T19/56) and rifle pit (T19/57). These three sites are "intimately associated in that they were designed and constructed as a whole, for use in a single engagement". Upper Redoubt (T19/55) The upper redoubt (also referred to as Mahaukura and the 'main redoubt') was modelled on a classic form of British redoubt, with earthen walls surrounded by a discontinuous outer ditch in a simple square plan (approximately 20 metres by 20 metres), and flanking angles in the north-western and south-eastern corners that would have held about twenty men each. Contemporary descriptions of the redoubt provide varying estimates for the height of the walls, ranging from 8 feet to 12 feet, but today there are few sections of the wall that exceed two metres (six feet, six inches). An inner ditch is present along parts of the wall, and it has been suggested that this may have been required to keep Te Kooti's men below the line of fire. Historical descriptions of the battle indicate that loopholes were also present in the walls of the redoubt, but they were no longer visible when the NHPT became involved with the management of the site in the late 1950s. The upper redoubt's entrance consists of a small break in the exterior ditch and outer western wall, with a small covering wall on the interior. This type of entrance is referred to as the "traverse method of defended access", and is derived from British redoubt construction. A further interesting feature of the upper redoubt is a low wall (also referred to as a 'breastwork') than runs across the interior of the redoubt from the eastern wall to the entrance in the western wall. The reason for this low wall is unclear, but it was possibly uncompleted. Lower redoubt (T19/56) The lower redoubt, also referred to as the "small pa", is located on a slight spur immediately west of the Whanganui River. It was recorded by Colin Smart in 1960, and is described as "a complicated maze of trenches" that would have provided cover from most directions. The sod and pumice walls are lower than those of the upper redoubt, and measure only four feet in most parts. The entrance is marked by a break in the wall at the eastern end, and there are also several minor projections of the wall into the trenches, which may have served as "defensive cross-barriers". Two loopholes were recorded by Smart in the north-western corner of the lower redoubt, where it was noted that the soil was rather sandy in comparison to the pumice and sod matrix of the other walls. These loopholes had a rectangular cross section and were approximately 15 centimetres wide and 7.5 centimetres deep. Their height above ground was recorded as three feet, and whilst some subsidence is likely, the defenders of the pa must have crouched beneath the wall to avoid the fire. Rifle pit (T19/57) The rifle pit is located to the east of the Whanganui River, some distance from the upper redoubt. Whilst the distance between the rifle pit and upper redoubt would suggest that it was used as an observation post, it is not positioned at a high enough elevation to provide commanding views of the surrounding landscape. The primary feature of the rifle pit is a five-foot deep trench that would have provided protection against fire from the east, but there are also subsidiary trenches that taper off to a depth of only 1 foot.
The three integral features of the Te Pōrere battle-site are the upper redoubt (T19/55), lower redoubt (T19/56) and rifle pit (T19/57). These three sites are "intimately associated in that they were designed and constructed as a whole, for use in a single engagement". Upper Redoubt (T19/55) The upper redoubt (also referred to as Mahaukura and the 'main redoubt') was modelled on a classic form of British redoubt, with earthen walls surrounded by a discontinuous outer ditch in a simple square plan (approximately 20 metres by 20 metres), and flanking angles in the north-western and south-eastern corners that would have held about twenty men each. Contemporary descriptions of the redoubt provide varying estimates for the height of the walls, ranging from 8 feet to 12 feet, but today there are few sections of the wall that exceed two metres (six feet, six inches). An inner ditch is present along parts of the wall, and it has been suggested that this may have been required to keep Te Kooti's men below the line of fire. Historical descriptions of the battle indicate that loopholes were also present in the walls of the redoubt, but they were no longer visible when the NHPT became involved with the management of the site in the late 1950s. The upper redoubt's entrance consists of a small break in the exterior ditch and outer western wall, with a small covering wall on the interior. This type of entrance is referred to as the "traverse method of defended access", and is derived from British redoubt construction. A further interesting feature of the upper redoubt is a low wall (also referred to as a 'breastwork') than runs across the interior of the redoubt from the eastern wall to the entrance in the western wall. The reason for this low wall is unclear, but it was possibly uncompleted. Lower redoubt (T19/56) The lower redoubt, also referred to as the "small pa", is located on a slight spur immediately west of the Whanganui River. It was recorded by Colin Smart in 1960, and is described as "a complicated maze of trenches" that would have provided cover from most directions. The sod and pumice walls are lower than those of the upper redoubt, and measure only four feet in most parts. The entrance is marked by a break in the wall at the eastern end, and there are also several minor projections of the wall into the trenches, which may have served as "defensive cross-barriers". Two loopholes were recorded by Smart in the north-western corner of the lower redoubt, where it was noted that the soil was rather sandy in comparison to the pumice and sod matrix of the other walls. These loopholes had a rectangular cross section and were approximately 15 centimetres wide and 7.5 centimetres deep. Their height above ground was recorded as three feet, and whilst some subsidence is likely, the defenders of the pa must have crouched beneath the wall to avoid the fire. Rifle pit (T19/57) The rifle pit is located to the east of the Whanganui River, some distance from the upper redoubt. Whilst the distance between the rifle pit and upper redoubt would suggest that it was used as an observation post, it is not positioned at a high enough elevation to provide commanding views of the surrounding landscape. The primary feature of the rifle pit is a five-foot deep trench that would have provided protection against fire from the east, but there are also subsidiary trenches that taper off to a depth of only 1 foot.
Historical and Associated Iwi / Hapū / Whānau
Iwi: Ngāti Tūwharetoa
Hapu: Ngāti Hikairo
Public NZAA Number
T19/55
Completion Date
18th April 2006
Report Written By
Jo Wylie
Information Sources
Binney, 1997
J Binney, Redemption Songs: A Life of Te Kooti Arikirangi Te Turuki. Auckland: University Press with Bridget Williams Books, 1997
Edmonds, 2002
J. Edmonds, 'Te Porere Pa: Maori Reservations and Historic Reserve'. Irimana Enterprises, 2002
Wilson, 1961 (2)
O. Wilson, War in the Tussock: Te Kooti and the Battle at Te Porere. Wellington: Government Printer in conjunction with National Historic Places Trust 1961.
Ritchie, 1994
N Ritchie and C. Barr (1994). 'Te Porere Management Plan Draft'. Hamilton: Department of Conservation.
Simpson, 1995
P Simpson and K Jones,. Archaeological Site Stabilisation and Vegetation Management, Case Studies I: Coromandel, Bay of Plenty and Hawkes Bay, Central Volcanic Plateau and Taranaki. Department of Conservation: Science and Research Series No. 84, 1995.
Other Information
Hapu: Ngati Hikairo Historic Reserve: New Zealand Gazette: 1966: 1581, 1977: 2700 Maori Reserve: New Zealand Gazette: 1959: 519, 1963: 1561, 1964: 1763 Please note that entry on the New Zealand Heritage List/Rarangi Korero identifies only the heritage values of the property concerned, and should not be construed as advice on the state of the property, or as a comment of its soundness or safety, including in regard to earthquake risk, safety in the event of fire, or insanitary conditions.
Current Usages
Uses: Commemoration
Specific Usage: Memorial - New Zealand Wars
Uses: Maori
Specific Usage: Site of historical event
Former Usages
General Usage: Maori
Specific Usage: kau-whanga-a-riri (landscape feature of battle site)
General Usage: Maori
Specific Usage: Urupā
Themes
War Memorial
Of Significance to Maori
Web Links
description: NZHPT Website Places to Visit
url: http://www.historicplaces.org.nz/placesToVisit/Central-BayofPlenty/Te%20Porere%20Redoubt.aspx
Sign up to hear more
Get the latest heritage news, features and events delivered
straight to your inbox.
